Plugins, Security, and Settings
This guide covers the administration and configuration pages of FlowForger Portal: plugin management, Custom APIs, security roles and access, environment variables, connection references, the Settings page, and the Pricing page. Web Resources are covered in Apps and Components.
Plugins
The Plugins group in the sidebar has four pages: Plugin Assemblies, Plugin Types, Plugin Trace Logs, and Custom APIs.
Plugin Assemblies
Navigate to Plugins → Plugin Assemblies to view all registered plugin assemblies in your environment.
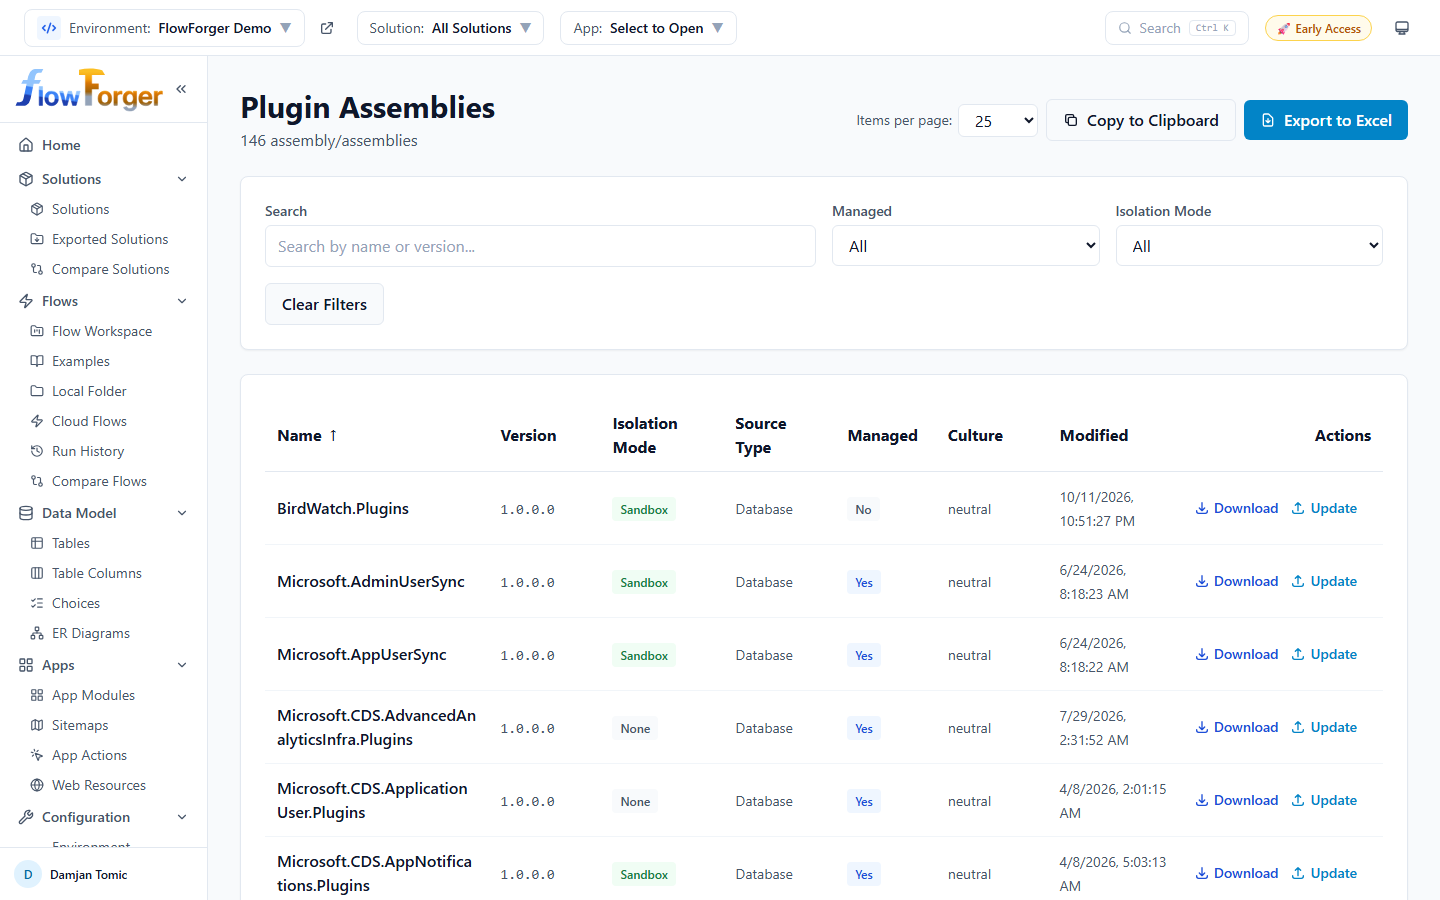 The Plugin Assemblies browser showing registered DLLs
Table columns:
- Name -- Assembly name with optional description
- Version -- Assembly version number in monospace font
- Isolation Mode -- Color-coded badge: None, Sandbox (green), or External (blue)
- Source Type -- Database, Disk, Normal, or Azure Web App
- Managed -- Yes/No badge
- Culture -- Assembly culture (typically "neutral")
- Modified -- Last modification date
Row actions:
- Download -- Downloads the assembly as a
.dllfile. - Update -- Opens a modal to upload a new version of the assembly DLL, replacing the current one in Dataverse.
Filters:
- Search -- Search by assembly name or version
- Managed -- All, Managed, or Unmanaged
- Isolation Mode -- All, None, Sandbox, or External
The list can be exported to the clipboard or Excel.
Plugin Types
Navigate to Plugins → Plugin Types to view all registered plugin types and their processing steps.
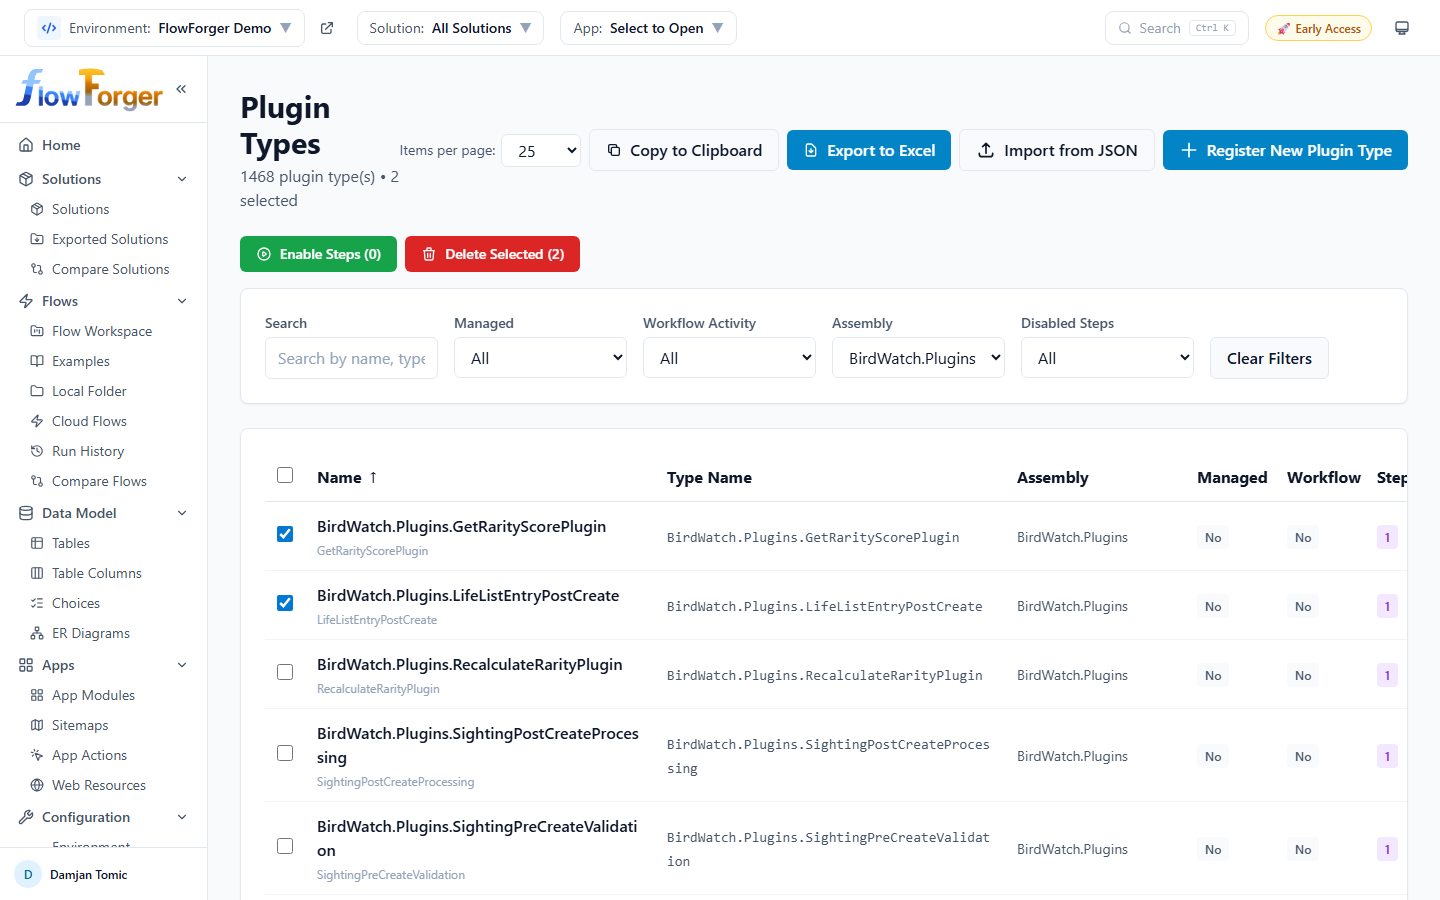 The Plugin Types browser with step counts and bulk actions
Table columns:
- Name -- Plugin type name with optional friendly name
- Type Name -- Full .NET type name in monospace font
- Assembly -- Parent assembly name
- Managed -- Yes/No badge
- Workflow -- Whether this is a workflow activity (Yes/No)
- Steps -- Count of registered steps. When some steps are disabled, the badge turns amber and shows how many are off (for example
5 | 2 off); hover it for the enabled/disabled split. - Modified -- Last modification date
Header buttons:
- Import from JSON -- Registers a plugin type with its steps and images from a JSON export taken in another environment (see Moving a registration to another environment).
- Register New Plugin Type -- Opens the registration modal. Pick a Plugin Assembly, then enter the Name, Type Name (
Namespace.ClassName), and optionally a Friendly Name, Description, and Workflow Activity Group Name. You can also load a local DLL to pick a class from it.
Bulk actions (select rows with the checkboxes):
- Enable Steps (N) -- Enables every disabled step of the selected plugin types. Steps that Dataverse refuses to change (for example managed ones) are reported individually.
- Delete Selected (N) -- Deletes the selected unmanaged plugin types. If they have steps, check Also delete N registered step(s) in the confirmation dialog: steps must be removed before their plugin type can be deleted.
Filters:
- Search -- Search by name, type name, or friendly name
- Managed -- All, Managed, or Unmanaged
- Workflow Activity -- All, Yes, or No
- Assembly -- Filter by parent assembly
- Disabled Steps -- All, Has Disabled, or None Disabled
Plugin Type Details
Click View Details on a row to open the Plugin Type Details modal.
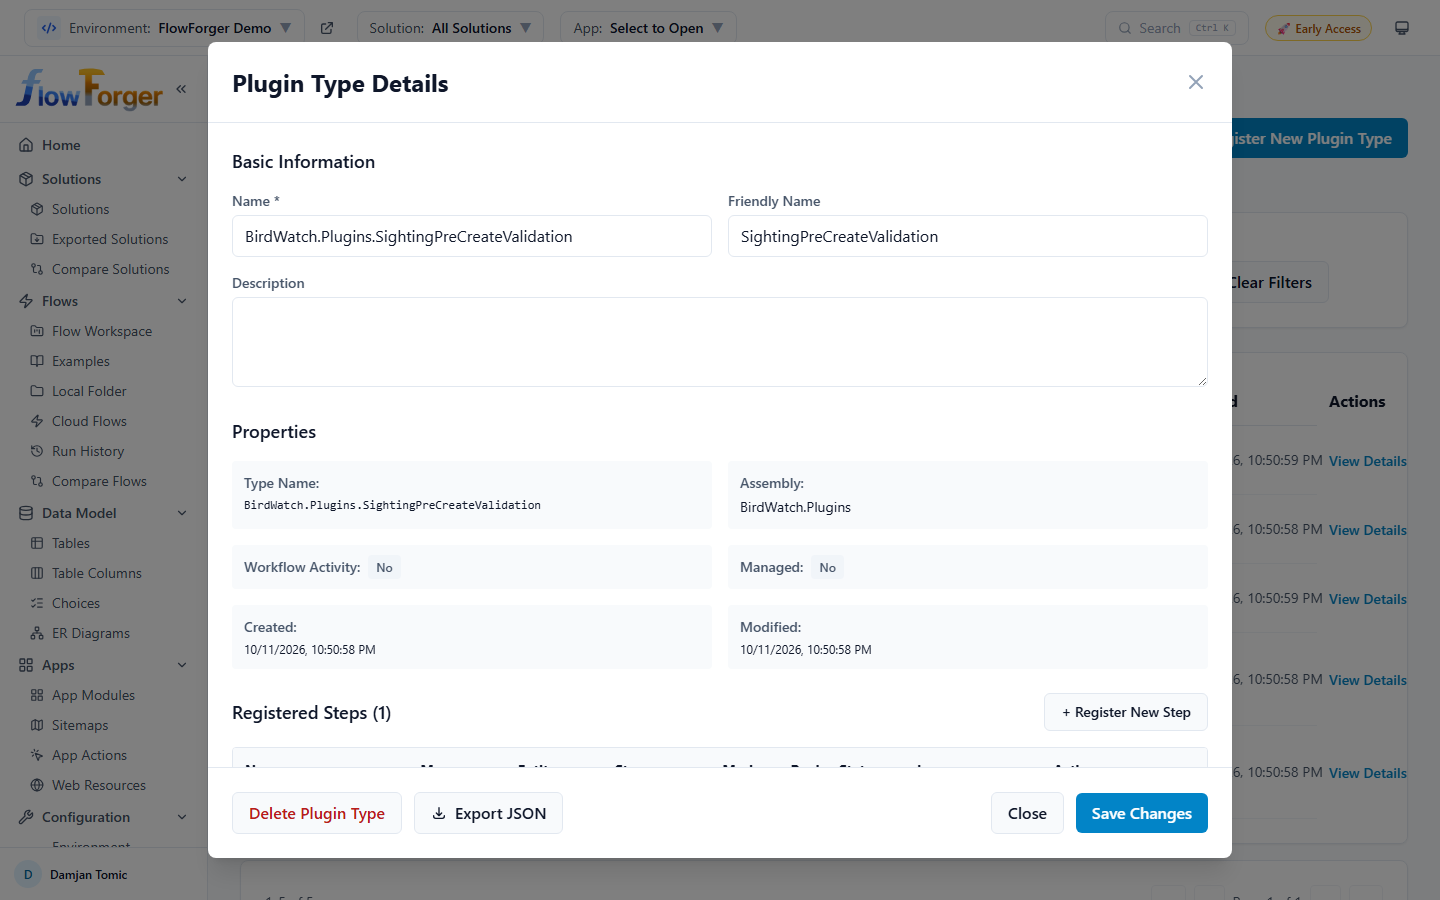 A plugin type with its registered steps and images
- Basic Information -- Edit the Name, Friendly Name, and Description (unmanaged types), then click Save Changes.
- Properties -- Type name, assembly, workflow activity, managed state, created and modified dates.
- Registered Steps -- A table with each step's name, message, entity, stage, mode, rank, status, and images. Per step you can Enable/Disable it, Edit it, or Delete it (unmanaged steps only).
- + Register New Step opens the step form: Name, Description, SDK Message, Entity (Logical Name), Stage (Pre-validation, Pre-operation, Post-operation), Mode (Synchronous or Asynchronous), Execution Order, Filtering Attributes (leave blank to run on every attribute change), and Configuration (unsecure configuration).
- In the Images column, click an image to edit it, or the add button to add one: Image Type (PreImage, PostImage, or Both), Name, Entity Alias, and Attributes.
- Export JSON -- Downloads the plugin type, its steps, and their images as a JSON file you can import into another environment.
- Delete Plugin Type -- Available for unmanaged types.
Solution targeting
When an unmanaged solution (other than the Default solution) is selected in the header, new registrations go into it:
- New steps and new images are added to the selected solution. The step and image forms show Will be added to solution: ....
- Register New Plugin Type adds the type's assembly to the selected solution, since plugin types themselves are not solution components.
With no solution, the Default solution, or a managed solution selected, nothing is added to a solution.
Moving a registration to another environment
Use Export JSON in the Plugin Type Details modal on the source environment, then switch to the target environment and click Import from JSON on the Plugin Types page.
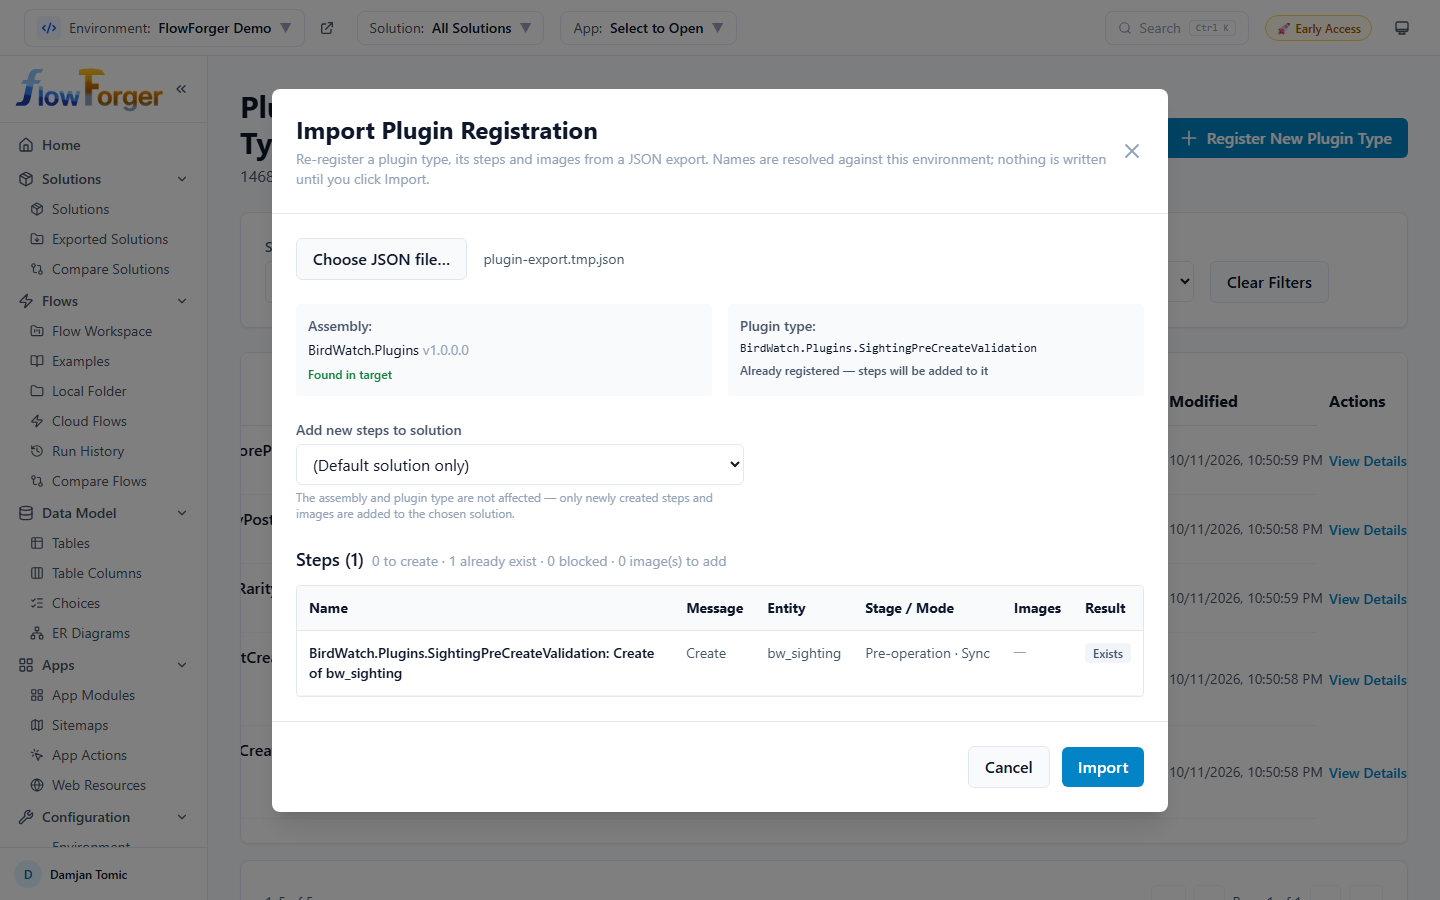 The import dialog showing what will be created, what already exists, and what is blocked
- Click Choose JSON file… and pick the export. FlowForger Portal resolves the assembly, SDK messages, entities, and users by name in the target environment. Nothing is written yet.
- Review the plan:
- Assembly -- Found in target or Not found in target. The assembly must already be registered in the target; if it is missing, the import is blocked.
- Plugin type -- Will be created, or Already registered — steps will be added to it.
- Steps -- One row per step with a Result badge: Create, Exists (a step with the same message, entity, stage, and mode is already registered; its missing images are still added), or Blocked (for example, the message is not available for that entity in the target). A blocked step does not stop the other steps.
- Warnings, for example a different assembly version, or an impersonating user that was not found (the step then runs as the calling user).
- Optionally pick a solution under Add new steps to solution. Only newly created steps and images are added to it; the assembly and plugin type are not affected.
- Click Import. Steps that were disabled in the source environment are created disabled. A summary lists how many steps were created, images added, and steps skipped.
Secure configuration is never exported.
Plugin Trace Logs
Navigate to Plugins → Plugin Trace Logs to view execution traces from plugin and workflow activity runs.
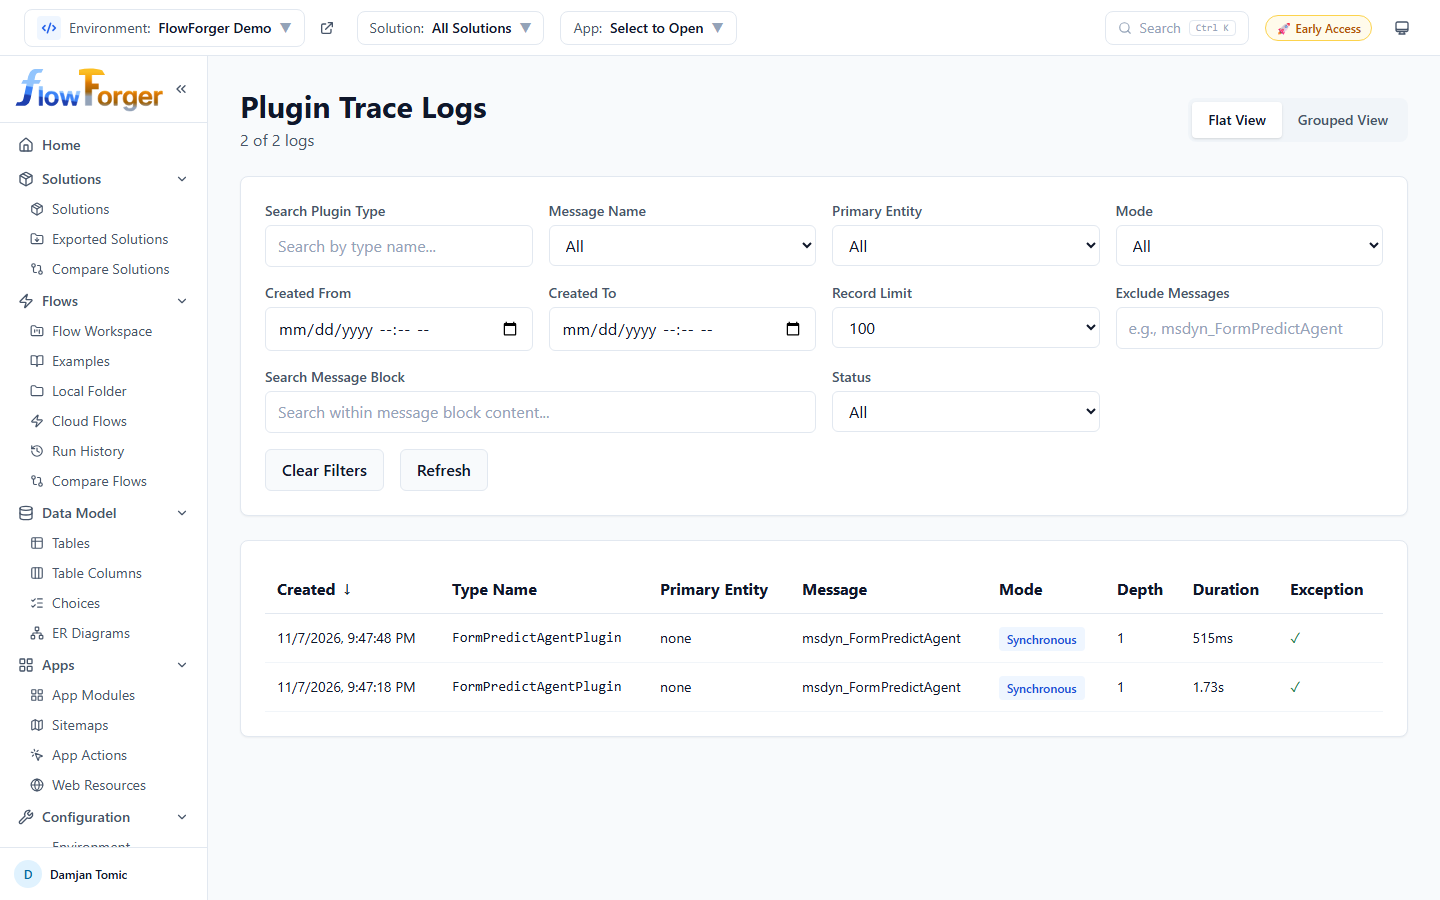 The Plugin Trace Logs viewer with flat and grouped views
View modes:
- Flat View -- Displays all logs in a simple chronological table
- Grouped View -- Groups logs by correlation ID, showing related plugin executions together with expand/collapse functionality. Each group shows the primary message, entity, total duration, and error count.
Table columns (Flat View):
- Created -- Timestamp (sortable)
- Type Name -- Shortened class name extracted from the full type name
- Primary Entity -- The entity the plugin executed against
- Message -- SDK message name (e.g., Create, Update, Delete)
- Mode -- Synchronous (blue) or Asynchronous (purple) badge
- Depth -- Execution depth level
- Duration -- Execution time (sortable), displayed in ms or seconds
- Exception -- Error indicator or a green checkmark for success
Detail modal:
Click any log row to open the detail modal showing:
- Full metadata (created date, mode, message, entity, depth, duration, correlation ID, request ID)
- Complete type name
- Exception details with stack trace, with a copy-to-clipboard button
- Related plugin executions by correlation ID (the chain of plugins triggered by the same operation)
- Message block content with search term highlighting and a copy-to-clipboard button
Filters:
- Search Plugin Type -- Search by type name
- Message Name -- Dropdown of all message names found in the logs
- Primary Entity -- Dropdown of all entities found in the logs
- Mode -- All, Synchronous, or Asynchronous
- Created From / Created To -- Date-time range pickers
- Record Limit -- Number of logs to fetch (50, 100, 250, 500, 1000)
- Exclude Messages -- Comma-separated list of message names to exclude from the query
- Search Message Block -- Full-text search within message block content
- Status -- All, Exception, or Success
Custom APIs
Navigate to Plugins → Custom APIs to browse, create, run, and manage Custom API definitions.
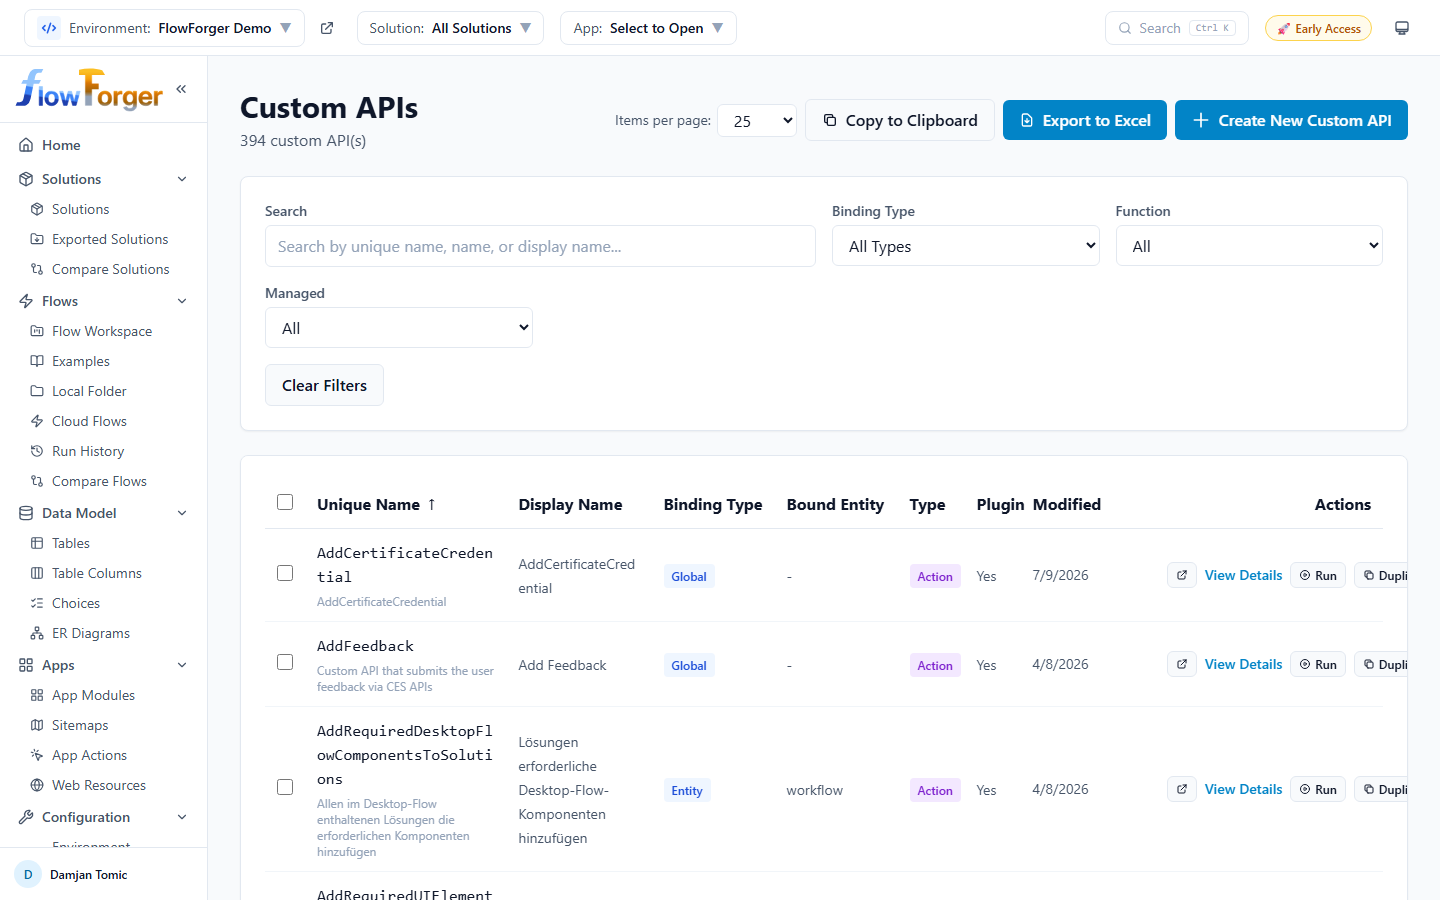 The Custom APIs browser with run and duplicate actions
Table columns:
- Unique Name -- The API's unique identifier with optional description
- Display Name -- User-friendly name
- Binding Type -- Global, Entity, or Entity Collection
- Bound Entity -- The entity the API is bound to (if applicable)
- Type -- Function (green) or Action (purple)
- Plugin -- Whether a plugin type is associated
- Modified -- Last modification date
Row actions:
- Open in Dataverse -- Link icon that opens the record in the Dataverse web interface
- View Details -- Opens a detail modal showing all API properties, request parameters, and response properties
- Run -- Opens the Custom API Runner to execute the API with input parameters and view the response
- Duplicate -- Creates a copy of the API definition with a new name
- Delete -- Available only for unmanaged APIs, with a confirmation dialog
Creating a new Custom API:
Click Create New Custom API in the header to open the creation modal. Fill in the unique name, display name, binding type, and other properties.
Custom API Runner:
The runner lets you:
- View the API's input parameters with their types
- Enter values for each parameter
- Execute the API against the current environment
- View the response
The Custom API Runner is one of the features with a free allowance once paid plans launch; see Pricing.
Filters:
- Search -- Search by unique name, name, or display name
- Binding Type -- All Types, Global, Entity, or Entity Collection
- Function -- All, Function, or Action
- Managed -- All, Managed, or Unmanaged
Security
The Users & Security group in the sidebar has pages for security roles, role comparison, table access, business units, users, and teams. Comparing two roles side by side (and merging privileges from one into another) is covered in Compare Tools.
Security Roles
Navigate to Users & Security → Security Roles to browse all security roles in the environment.
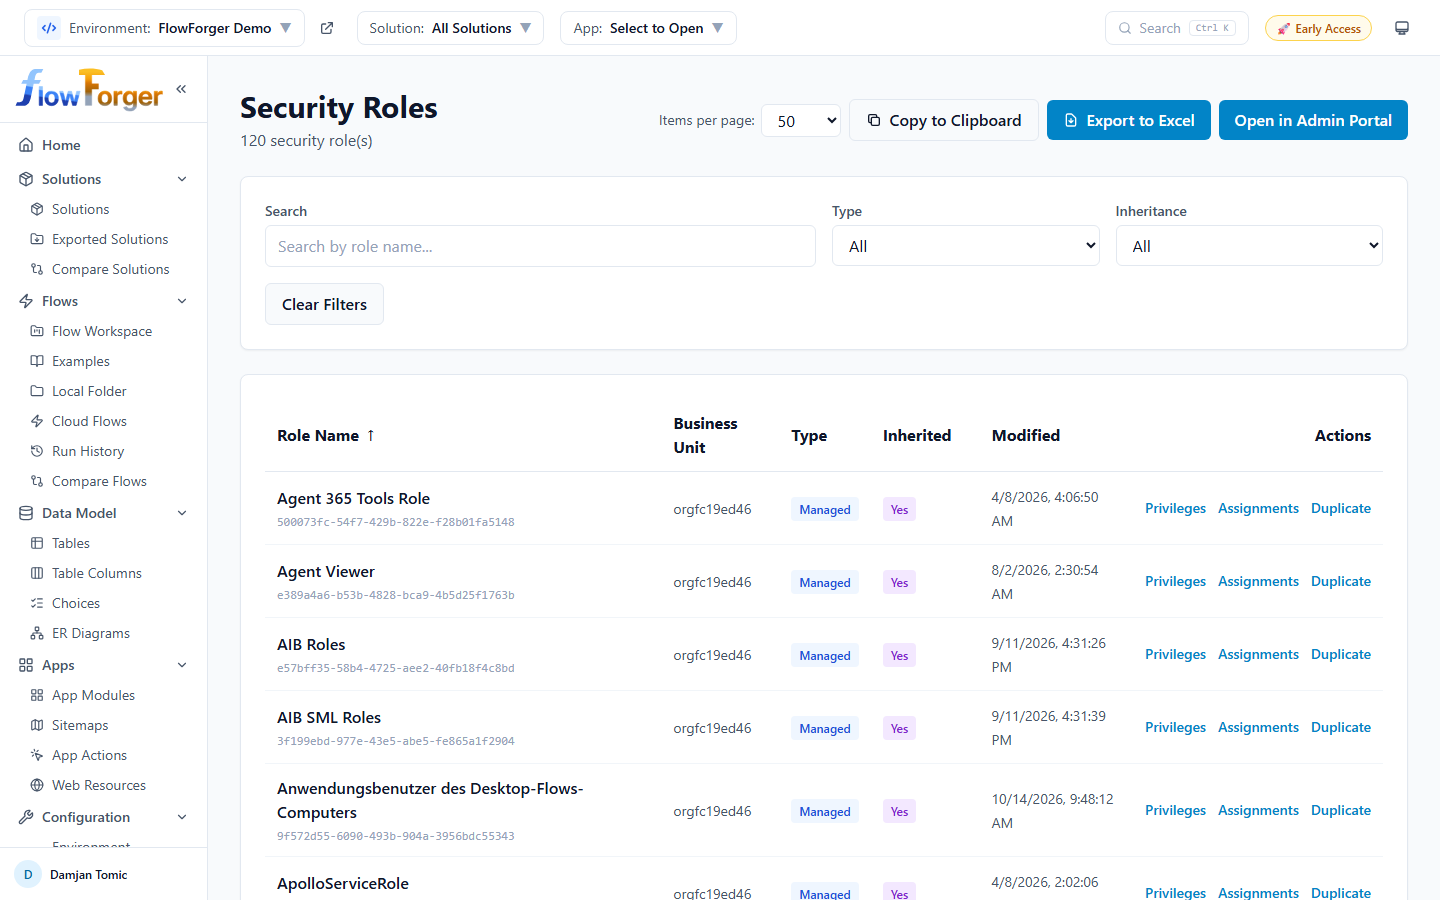 The Security Roles list with privilege, assignment, and duplicate actions
Table columns:
- Role Name -- Name and role ID
- Business Unit -- The business unit the role belongs to
- Type -- Managed (blue) or Unmanaged (green)
- Inherited -- Whether the role is inherited from a parent business unit (Yes/No)
- Modified -- Last modification date
Row actions:
- Privileges -- Opens the role on its Privileges tab
- Assignments -- Opens the role on its Assignments tab
- Duplicate -- Opens the Duplicate Security Role dialog. Enter a New role name and click Duplicate to create a role in the same business unit with the same privileges. If a solution is selected in the header, the new role is added to it.
Header: An Open in Admin Portal button links to the Power Platform admin center for the current environment.
Filters:
- Search -- Search by role name
- Type -- All, Managed, or Unmanaged
- Inheritance -- All, Inherited, or Direct
Security Role Detail
Clicking Privileges or Assignments opens the role's detail page. The header shows the role name, Managed/Unmanaged and Inherited badges, the business unit, the role ID, and an Open in Admin Portal button. Two tabs sit below it: Privileges and Assignments. The selected tab is part of the URL (#privileges or #assignments), so you can share a link to either one.
Privileges tab
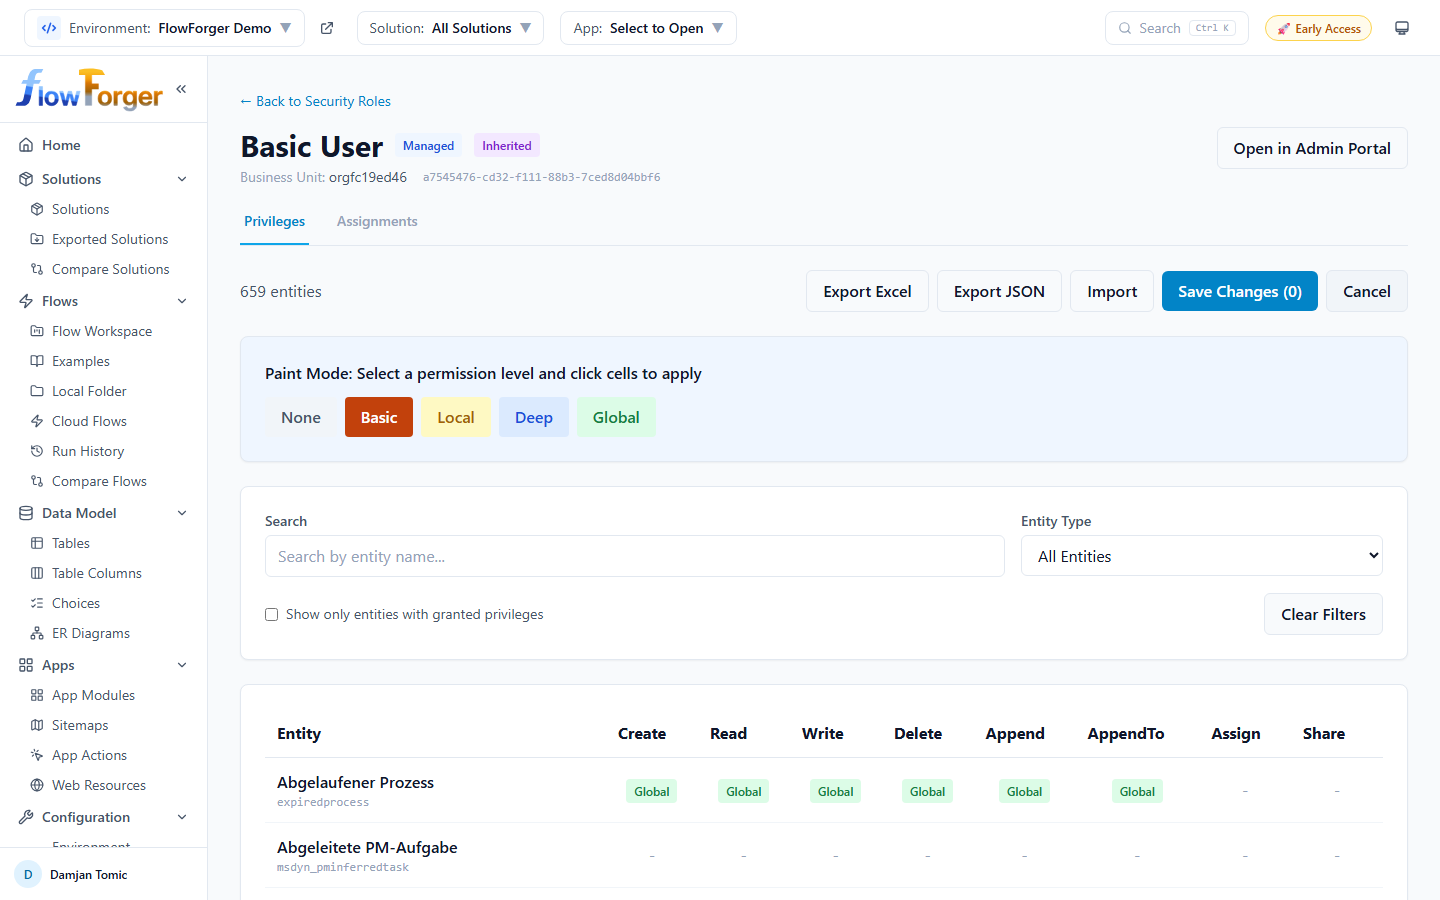 The privileges grid showing permissions per entity
The tab shows a matrix of entities and privilege types:
- Rows -- Each entity with privileges
- Columns -- Create, Read, Write, Delete, Append, AppendTo, Assign, Share
- Cells -- The privilege depth as a color-coded marker. The Privilege Depth Legend below the grid explains them:
- Basic -- User's own records
- Local -- Records in the user's business unit
- Deep -- Records in the user's business unit and child business units
- Global -- All records in the organization
Editing privileges:
- Click Edit Privileges.
- In the paint-mode toolbar, select a level: None, Basic, Local, Deep, or Global.
- Click cells to apply the selected level. Changed cells are highlighted.
- Click Save Changes (N) to write the changes, or Cancel to discard them.
Toolbar:
- Export Excel -- Exports the privilege matrix to Excel
- Export JSON -- Exports the role's privileges as a portable JSON file, which you can load in Compare Roles to compare against a role in another environment
- Import -- Imports privileges from an Excel file. The imported values are loaded as unsaved changes in edit mode, so you can review them before clicking Save Changes.
Filters:
- Search -- Filter entities by name
- Entity Type -- All Entities, Custom Only, or System Only
- Show only entities with granted privileges -- Hide entities with no privileges
Assignments tab
The tab has two sub-tabs, Users (N) and Teams (N):
- Users -- Lists the users assigned to the role with their name, email, and status. Click Add User to assign another user through a user picker, or Remove on a row to take the role away from that user (after a confirmation). Use Show disabled users to include disabled accounts.
- Teams -- Lists the teams assigned to the role with their name, type (Owner, Access, AAD Security Group, and so on), default status, and description. Remove on a row removes the role from that team. A Team Type Legend explains the team types.
Both lists can be searched and exported to the clipboard or Excel.
Business Units
Navigate to Users & Security → Business Units to view the organizational hierarchy.
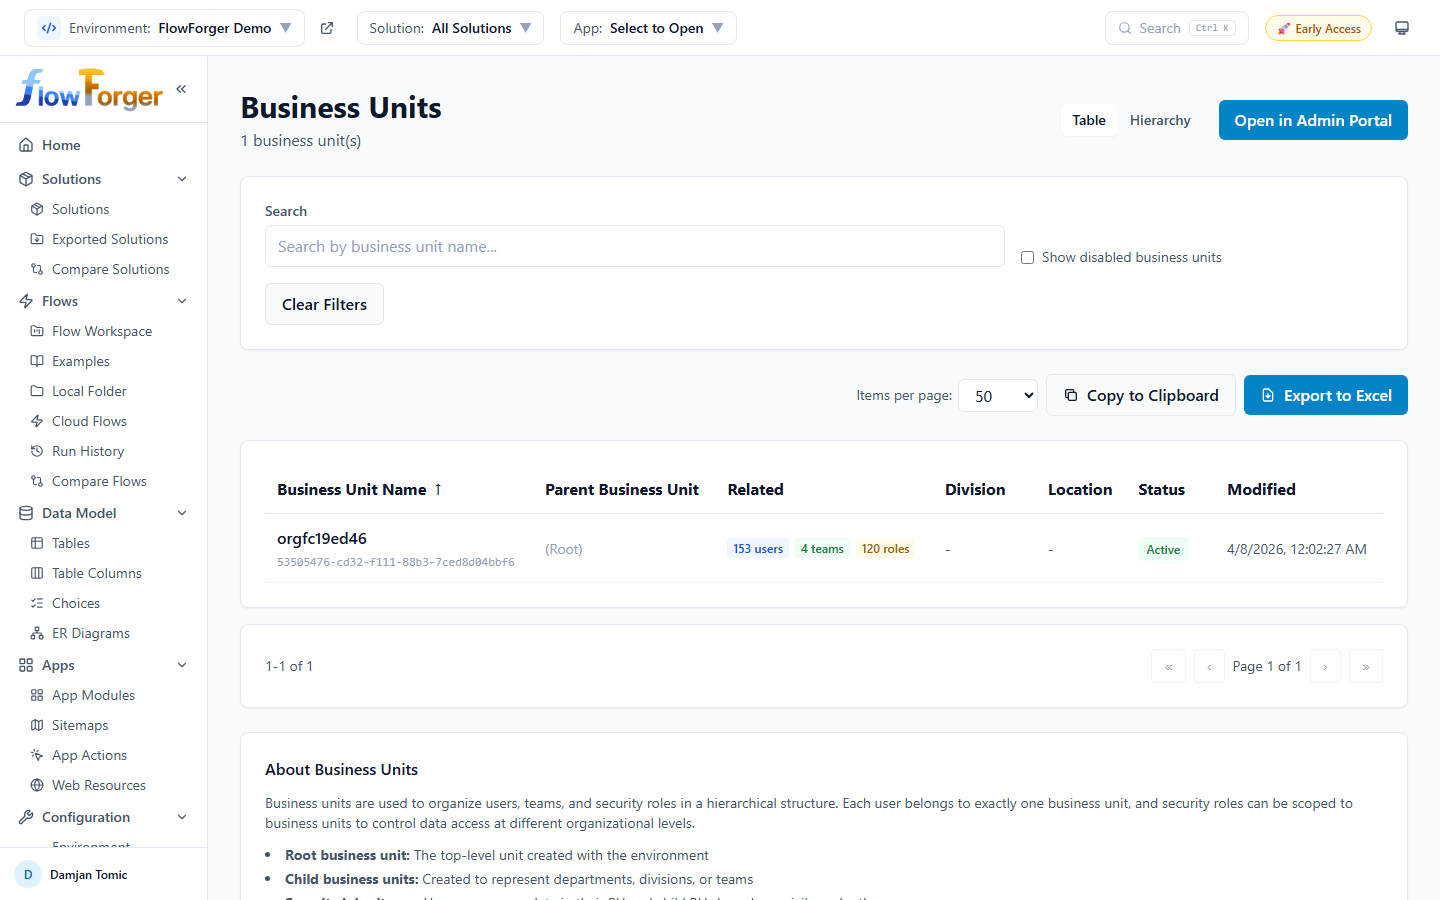 The Business Units page with table and hierarchy views
View modes:
- Table -- Standard data table with sortable columns (Business Unit Name, Parent Business Unit, Related counts, Division, Location, Status, Modified)
- Hierarchy -- Interactive tree view showing the parent-child relationships between business units
Related counts:
For each business unit, the page shows counts of:
- Users (blue badge)
- Teams (green badge)
- Security roles (amber badge)
Detail panel:
Click any business unit (in either view mode) to open a detail side panel showing full information and related entities.
Filters:
- Search -- Search by business unit name
- Show disabled business units -- Checkbox to include disabled business units
Tree view features:
- Expand/collapse individual nodes or use Expand All / Collapse All
- All nodes expand automatically when searching
- The root business unit is marked with a "Root" badge
- Child nodes are indented, with child count badges
Users
Navigate to Users & Security → Users to browse all system users in the environment.
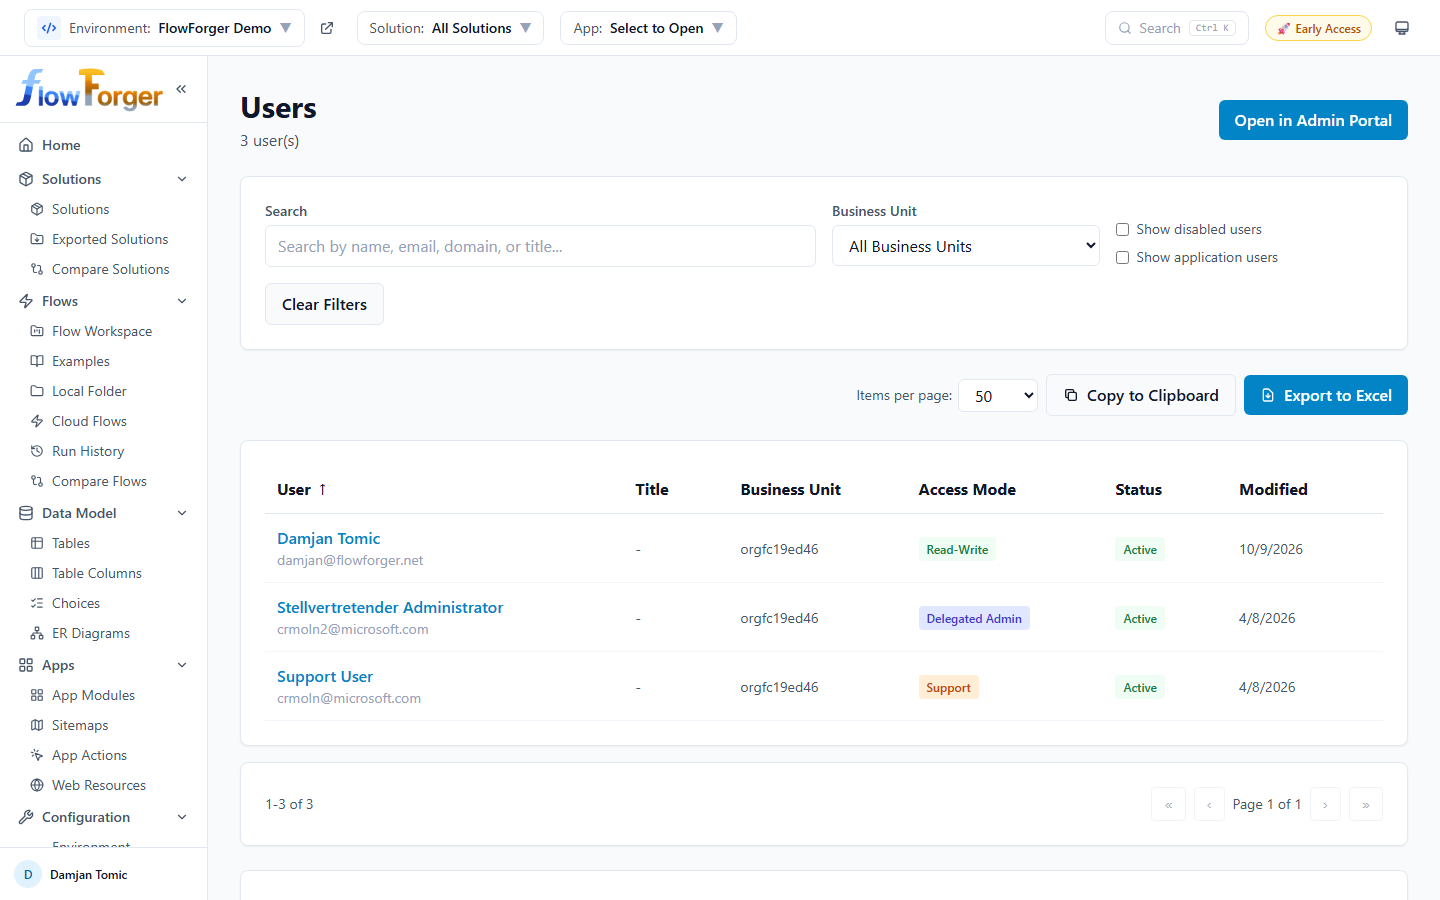 The Users browser with access mode badges
Table columns:
- User -- Full name and email/domain
- Title -- Job title
- Business Unit -- The user's business unit
- Access Mode -- Color-coded badge:
- Read-Write (green), Administrative (purple), Read (blue), Support (orange), Non-Interactive (gray), Delegated Admin (indigo)
- Status -- Active (green) or Disabled (red)
- Modified -- Last modification date
Filters:
- Search -- Search by name, email, domain, or title
- Business Unit -- Filter by business unit
- Show disabled users -- Checkbox
- Show application users -- Checkbox (includes system and service accounts)
An info card at the bottom explains the different access modes. The list can be exported to the clipboard or Excel.
User Detail
Click any user in the Users browser to open their detail page.
The header shows an avatar, full name, Active/Disabled badge, access mode badge, and a grid of details (email, domain, title, business unit, manager, phone numbers, and application ID for non-interactive/service accounts).
Below the header, three tabs provide drill-down views:
| Tab | Description |
|---|---|
| Teams | Teams the user belongs to |
| Security Roles | Security roles assigned to the user |
| Permissions | Effective table permissions for the user (combining their roles and team memberships) |
The active tab is reflected in the URL (e.g., #roles), so links to a specific tab can be shared directly.
Teams
Navigate to Users & Security → Teams to browse Dataverse teams -- groups of users used for security role assignment and record sharing.
Table columns:
- Team -- Name, with description shown below
- Type -- Color-coded badge: Owner, Access, AAD Security Group, AAD Office Group, or AAD Membership Group
- Business Unit -- The team's business unit
- Administrator -- The team's administrator user
- Default -- Badge marking a business unit's default team
- Modified -- Last modification date
Filters:
- Search -- Search by name, description, or administrator
- Business Unit -- Filter by business unit
- Team Type -- Filter by one of the team types above
The list supports pagination and export to the clipboard or Excel.
Team Detail
Click any team row to open its detail page.
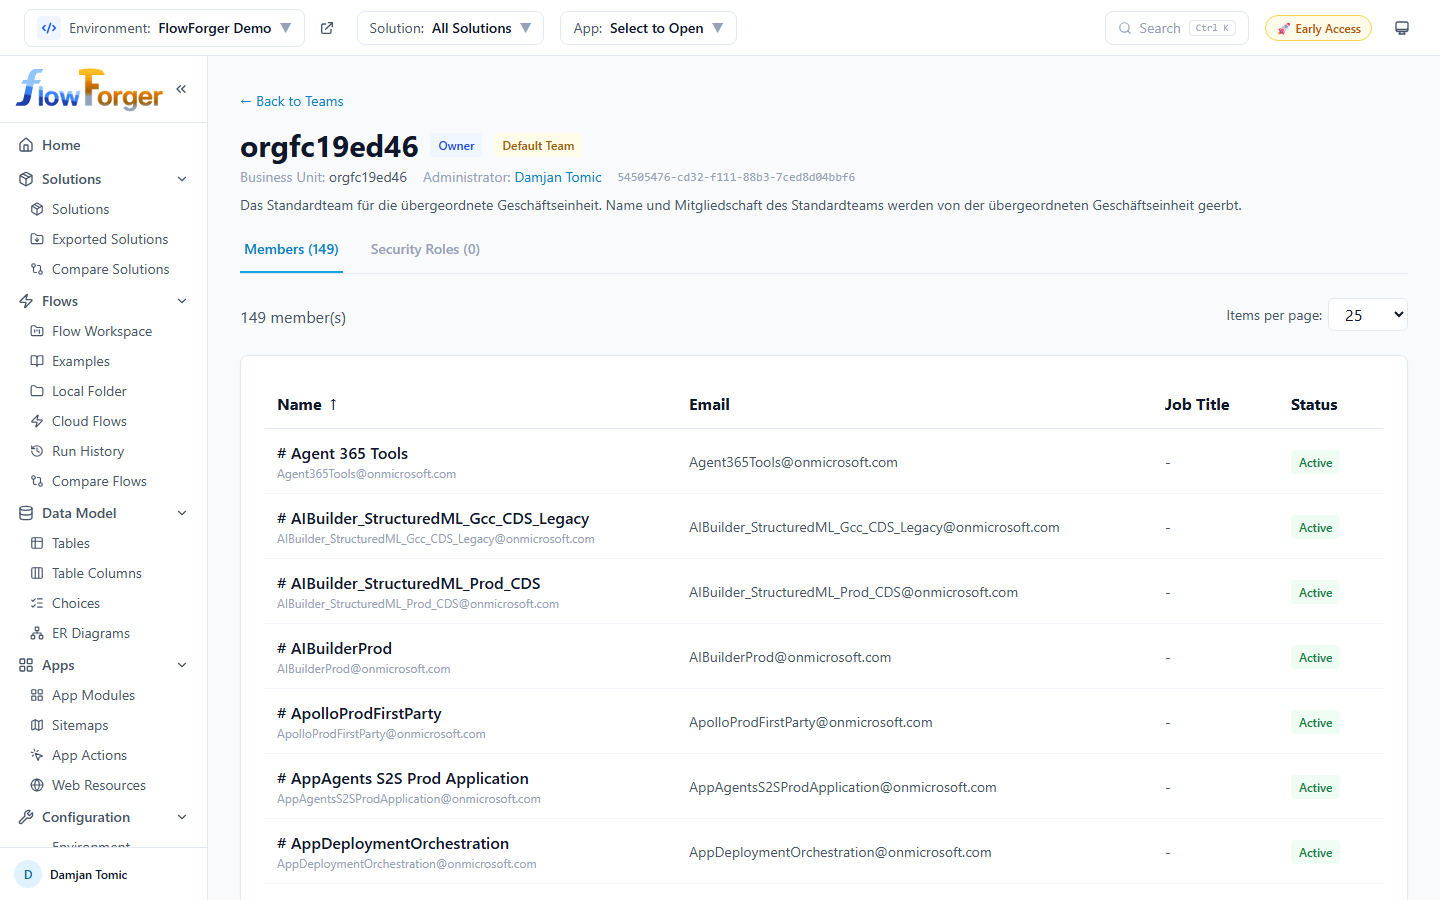 A team's members and assigned security roles
The header shows the team name, its type badge, a Default Team badge where it applies, the business unit, the administrator (a link to their user page), the team ID, and the description. Two tabs list:
- Members -- Each member's name, email, job title, and status
- Security Roles -- The roles assigned to the team, with business unit and managed state
Table Access
There are two ways to see which security roles have access to a table:
- From the Table Details page: Click View Permissions in the table header.
- From the sidebar: Navigate to Users & Security → Table Access for a list of all tables (searchable, with an All Tables / Custom Only / System Only filter), then click a table.
Both open the table's access matrix: every security role with its Create, Read, Write, Delete, Append, AppendTo, Assign, and Share depth for that table. Use Search Roles and Show only roles with permissions to narrow it down, and Export to Excel to save it. Click a role name to open that role's Privileges tab, already filtered to this table.
Environment Configuration
The Configuration group in the sidebar has Environment Variables and Connection References. Both pages show only the selected solution's items when a solution is selected in the header.
Environment Variables
Navigate to Configuration → Environment Variables to manage environment-specific configuration values.
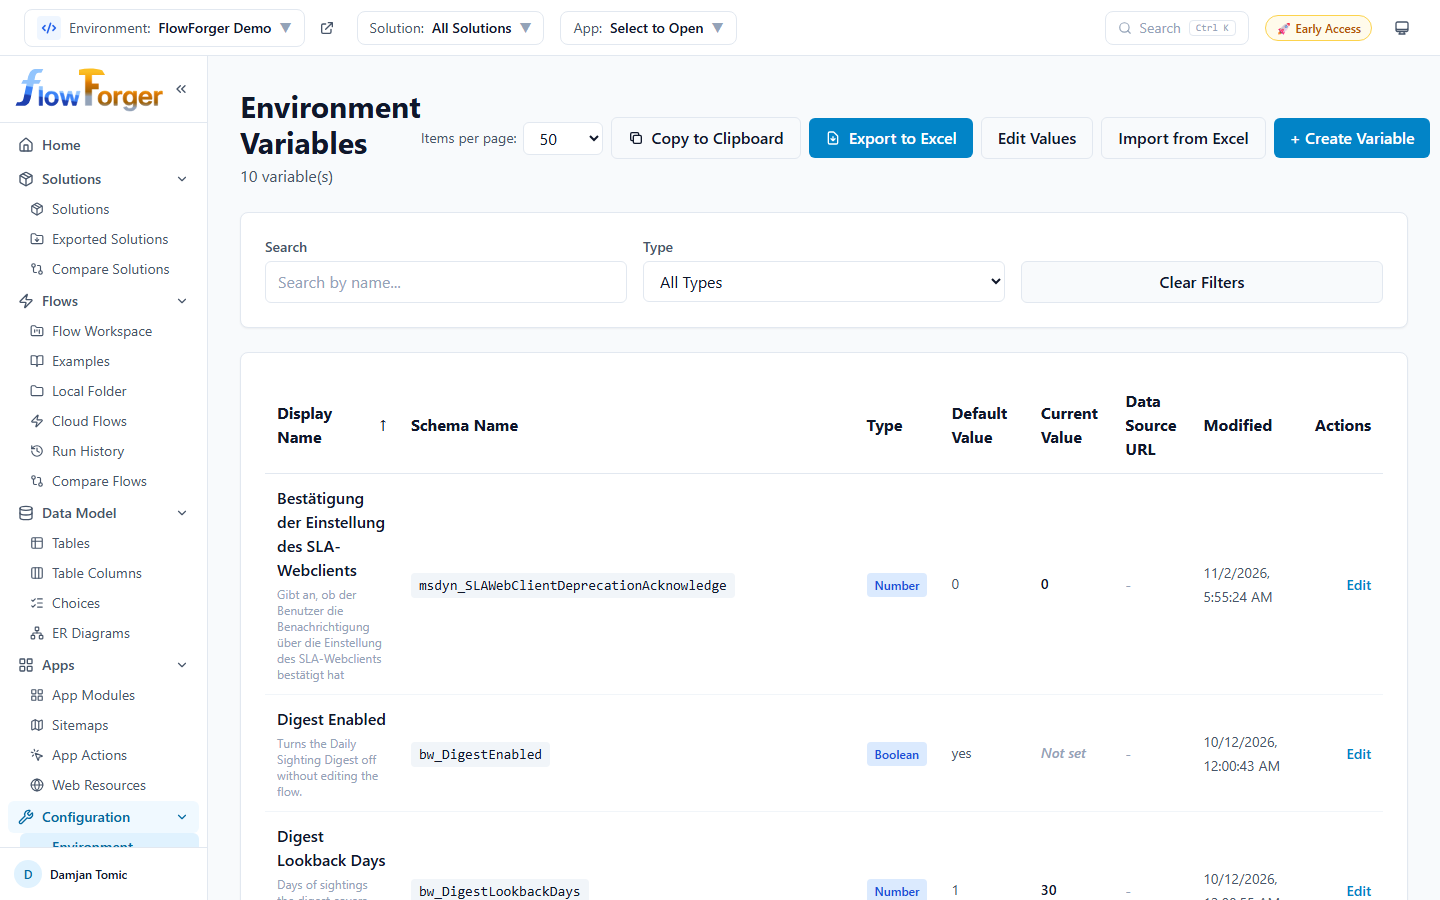 The Environment Variables page with edit, import, and create actions
Table columns:
- Display Name -- Variable name with optional description
- Schema Name -- The unique schema name in a code badge
- Type -- Color-coded badge (String, Number, Boolean, JSON, Data Source, Secret)
- Default Value -- The fallback value
- Current Value -- The value set for this environment (shows "Not set" in italic if there is none)
- Data Source URL -- For SharePoint data source variables, a link to the site or to the list/library (resolved to its title). String variables that hold a SharePoint drive ID or file ID are resolved to a link too. While resolving, the cell shows Resolving...; if the value cannot be found, Could not resolve.
- Modified -- When the current value was last changed (or the definition, if there is no value)
Header buttons:
- Edit Values -- Switches the table to inline editing: the Current Value cells become inputs (a checkbox for Boolean, a number input for Number, a password input for Secret). The header shows the number of unsaved changes; click Save All to write them, or Cancel to discard them.
- Import from Excel -- Opens the import modal to bulk-update values from an Excel spreadsheet.
- + Create Variable -- Opens the creation form.
Editing one variable:
Click Edit on a row to open Edit Environment Variable:
- Display name and Description -- Editable
- Schema Name, Type, and Default Value -- Read-only
- Current Value -- Editable (a password input for Secret). For a SharePoint list/library data source, the field lists the lists of the parent site so you can pick one by title, or enter the GUID manually; the Parent Site URL of the linked site variable can be changed here too.
- Flows Using This Variable -- Lists all flows that reference this variable, with links to each flow
Creating variables:
Click + Create Variable to open the creation form:
- Display Name (required)
- Schema Name (required) -- Use your publisher prefix (e.g.,
new_MyVariable); no spaces - Type (required) -- String, Number, Boolean, JSON, Data Source, or Secret
- Description (optional)
- For Data Source: choose the Data Source Kind -- Site (stores a SharePoint site URL) or List / Library (stores a list GUID linked to a parent site variable, which you pick or create in the same form)
- Default Value (optional; a password input for Secret)
- Current Value (Optional) -- An initial value for this environment
Filters:
- Search -- Search by display name or schema name
- Type -- Filter by variable type
Connection References
Navigate to Configuration → Connection References to view all connection references in your environment.
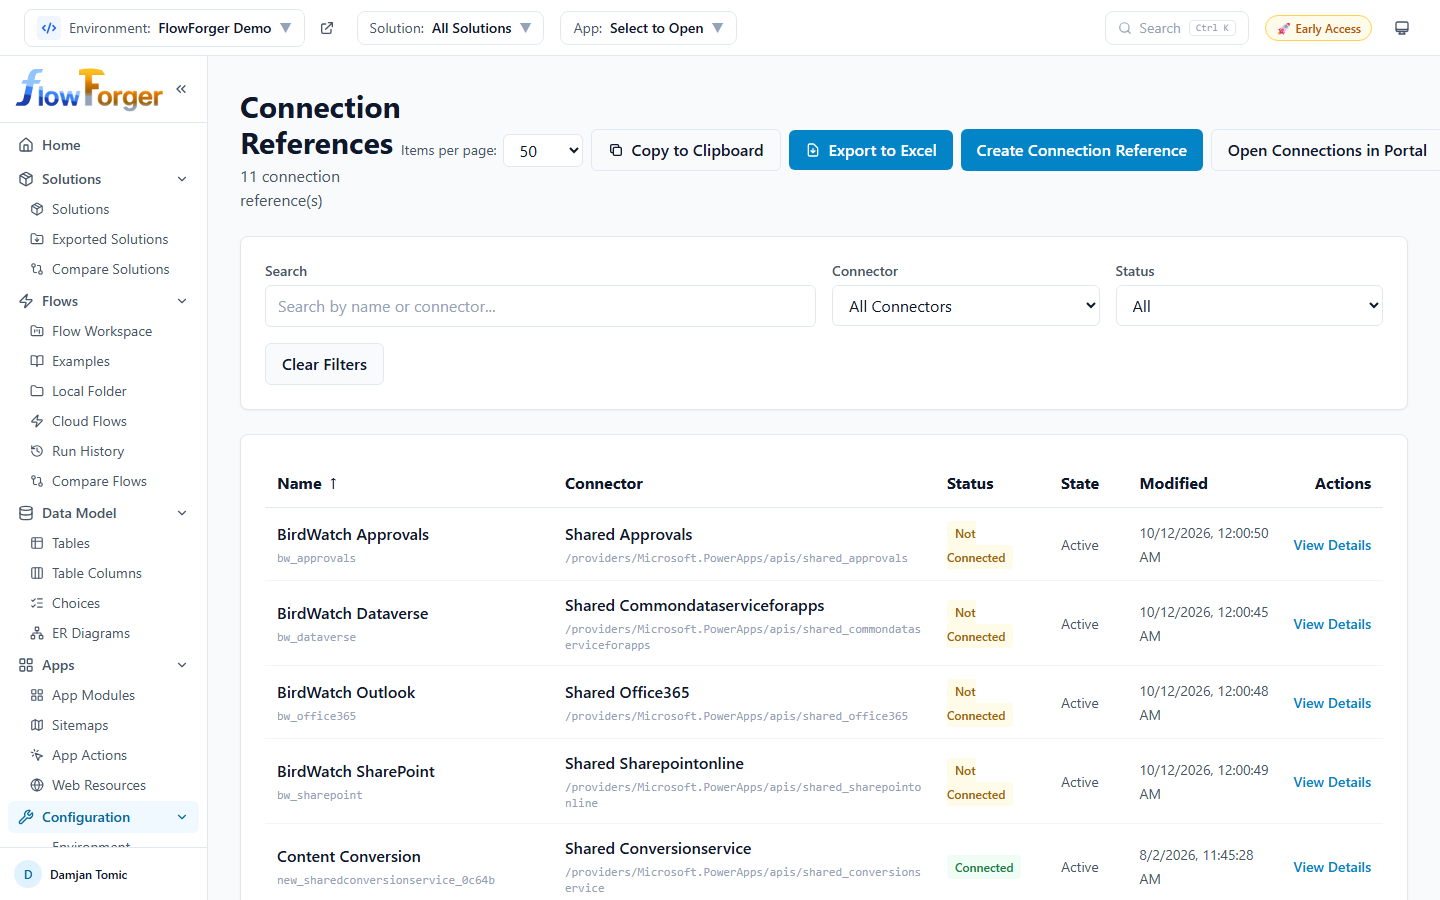 The Connection References browser with status indicators
Table columns:
- Name -- Display name with logical name shown below
- Connector -- Connector display name with the full API ID shown below
- Status -- Connected (green) or Not Connected (yellow) badge
- State -- Active or other state
- Modified -- Last modification date
Row actions:
- View Details -- Opens a detail modal showing:
- Connection reference ID and status
- Full connector information
- Current connection ID (if connected)
- Created/modified dates with user names
- Flows Using This Connection Reference -- Lists all flows that use this reference
- A note about managing connections in the Power Platform portal
Header buttons:
-
Create Connection Reference -- Opens the creation form:
- Display Name (required)
- Logical Name (required)
- Connector (required) -- Select from common connectors (SharePoint, Dataverse, Office 365, Teams, and so on) or Enter custom connector ID
- Description (optional)
If a solution is selected, the connection reference is created in that solution.
-
Open Connections in Portal -- Opens the connections page of the Power Apps maker portal.
Note: After creating a connection reference, you need to connect it in the Power Platform maker portal before flows can use it.
Filters:
- Search -- Search by name or connector
- Connector -- Filter by connector
- Status -- All, Connected, or Not Connected
Settings
Navigate to Settings at the bottom of the sidebar to configure FlowForger Portal.
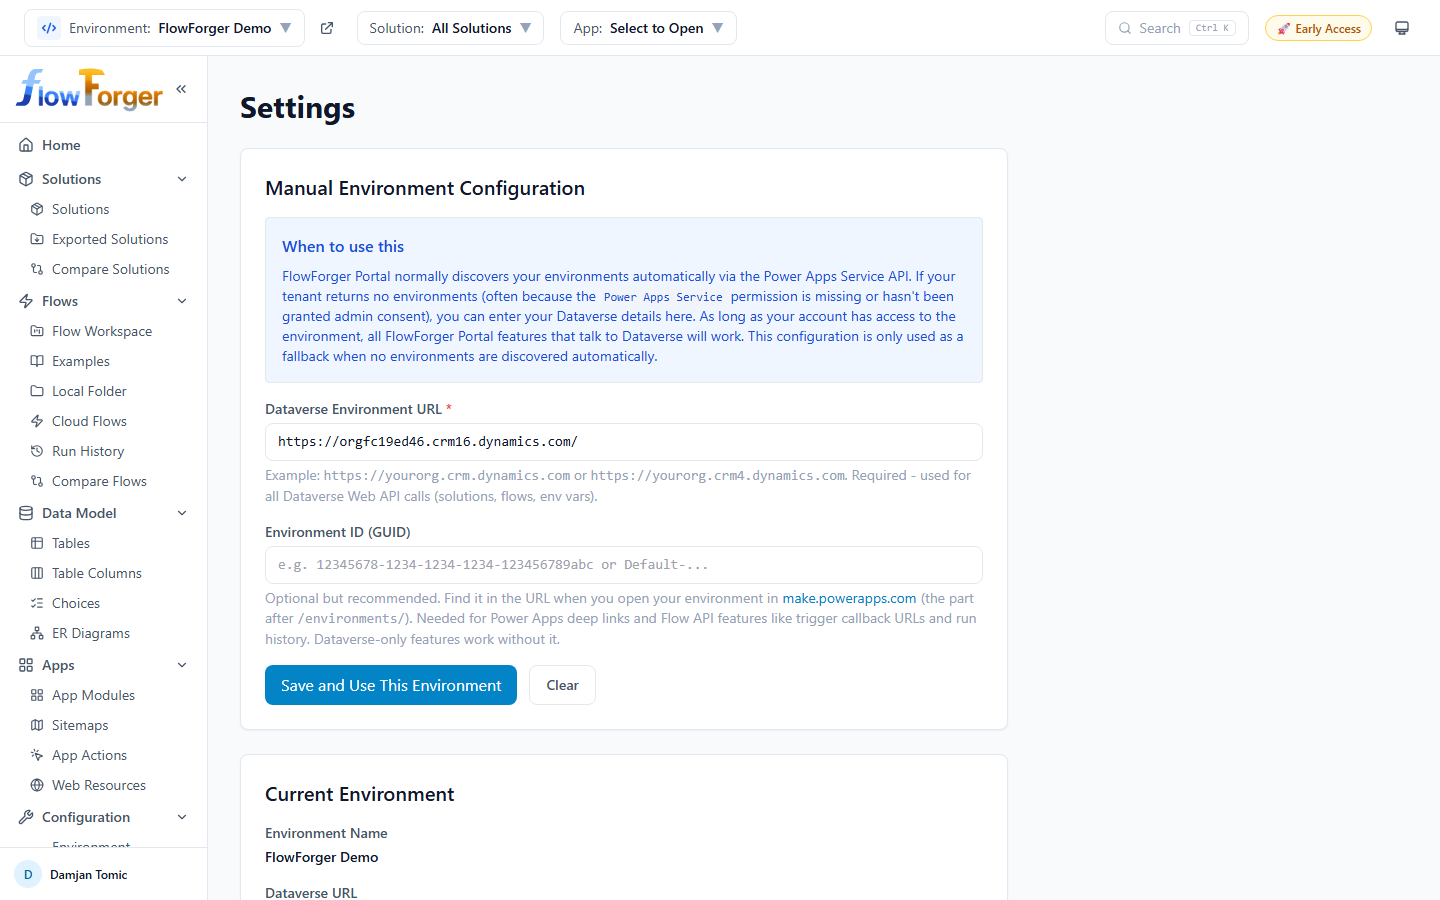 The Settings page
Account sign-up notice
If you signed in through the browser extension, you have no FlowForger Portal account yet, and a notice at the top of the page offers to create one with just your email, so your settings sync across devices. Your Microsoft 365 tokens stay in your browser either way.
Manual Environment Configuration
FlowForger Portal normally discovers your environments automatically. If your tenant returns none (often because the Power Apps Service permission is missing or has no admin consent), enter the environment here:
- Dataverse Environment URL (required) -- For example
https://contoso.crm.dynamics.com. Used for all Dataverse calls. - Environment ID (GUID) -- Optional but recommended. You find it in the URL when you open the environment in make.powerapps.com (the part after
/environments/). It is needed for Power Apps deep links and for features that use the Power Automate API, such as trigger callback URLs and run history.
Click Save and Use This Environment. Clear removes the manual configuration. It is only used when no environments are discovered automatically.
Current Environment
Shows the environment selected in the header:
- Environment Name -- The friendly display name
- Dataverse URL -- The instance URL, with a note on whether it was configured manually or comes from the header selection
- Environment Type -- For example Production or Sandbox
If no environment is selected, a notice asks you to select one from the header.
Authentication
Explains how FlowForger Portal signs you in: with your Microsoft work or school account, after you grant consent to access Power Platform resources. Tokens are acquired on demand for each API call, and no credentials are stored.
App Permissions
FlowForger Portal uses the permissions defined on its app registration to call Microsoft Graph, Dataverse (Dynamics CRM), and Power Platform, including the Microsoft Graph access (Sites.ReadWrite.All) that SharePoint connector actions in the local runner and the SharePoint pages need.
Click Grant App Permissions to open the Microsoft consent screen. It grants all permissions defined on the app registration at once, not only the SharePoint ones, so use it to consent to or refresh the full permission set. If some permissions need an administrator's approval, an Admin Consent Required notice appears with an admin consent URL you can copy and send to a Global Administrator or Privileged Role Administrator.
Display
Table Density -- Comfortable (default) or Compact (tighter rows). Controls the row padding of tables throughout the app.
Data & Backup
Backup flow definitions before saving to Dataverse -- When checked, FlowForger Portal stores a backup copy of a flow's definition in your Portal account before saving changes to Dataverse. If you have not chosen yet, you are asked on your first save.
Local Development
Points to the Local Folder page in the sidebar, where you pick a local folder of .ff.ts files. Your browser reads the files directly; nothing is sent to a server.
FlowForger Portal Configuration
Controls how flows are converted between Logic Apps JSON and the TypeScript DSL.
Generator Settings (how DSL is generated):
- Multiline Expression Handling -- Preserve keeps multiline expressions as they are (better parity with the original flow); Flatten converts them to a single line.
- Argument Whitespace -- Spaced (
func(a, b, c)) or Compact (func(a,b,c)). - Expression Fidelity -- Strict keeps the original expression text exactly, falling back to
ctx.eval(...)when regenerating it would change cosmetic details such as comma spacing or function-name casing. Relaxed always generates native DSL; the meaning is the same, but saving the flow rewrites those expressions in a canonical form, which shows up as a text difference in flow history and parity checks. - Action Description Style -- How action descriptions appear above each action: Line comment (
// My description) or JSDoc tag (/** @description My description */). Both round-trip.
Parser Settings (how Logic Apps JSON is read):
- Skip Metadata Fields -- Comma-separated metadata fields to ignore (e.g.,
operationMetadataId). - Skip Action Names for Kinds -- Comma-separated action kinds (lowercase, e.g.,
initializevariable, setvariable) whose action names are not preserved; those actions get default names when regenerated.
Changes are saved automatically. When you are signed in with a Portal account, they are synced to it and available on any device. Reset to Defaults restores the default configuration after a confirmation.
Legal & Privacy
Shows which versions of the Terms of Service and Privacy Policy you accepted, with links to both and to the FAQ. Withdraw Consent logs you out; you must accept the terms again to keep using the Portal. It does not delete your data.
Account
Shown when you are signed in with a Portal account:
- Download My Data -- Downloads your flows, ERDs, settings, and profile as a zip file.
- Delete My Account -- Permanently deletes your account and all associated data, after a confirmation. This cannot be undone.
About FlowForger Portal
A short description of the Portal and its version number.
Pricing
Navigate to Pricing (/pricing) to see FlowForger Portal's plans. The Portal is currently in early access: paid plans are planned but not available yet, and no feature limits are enforced -- every feature on this page can be used today at no cost.
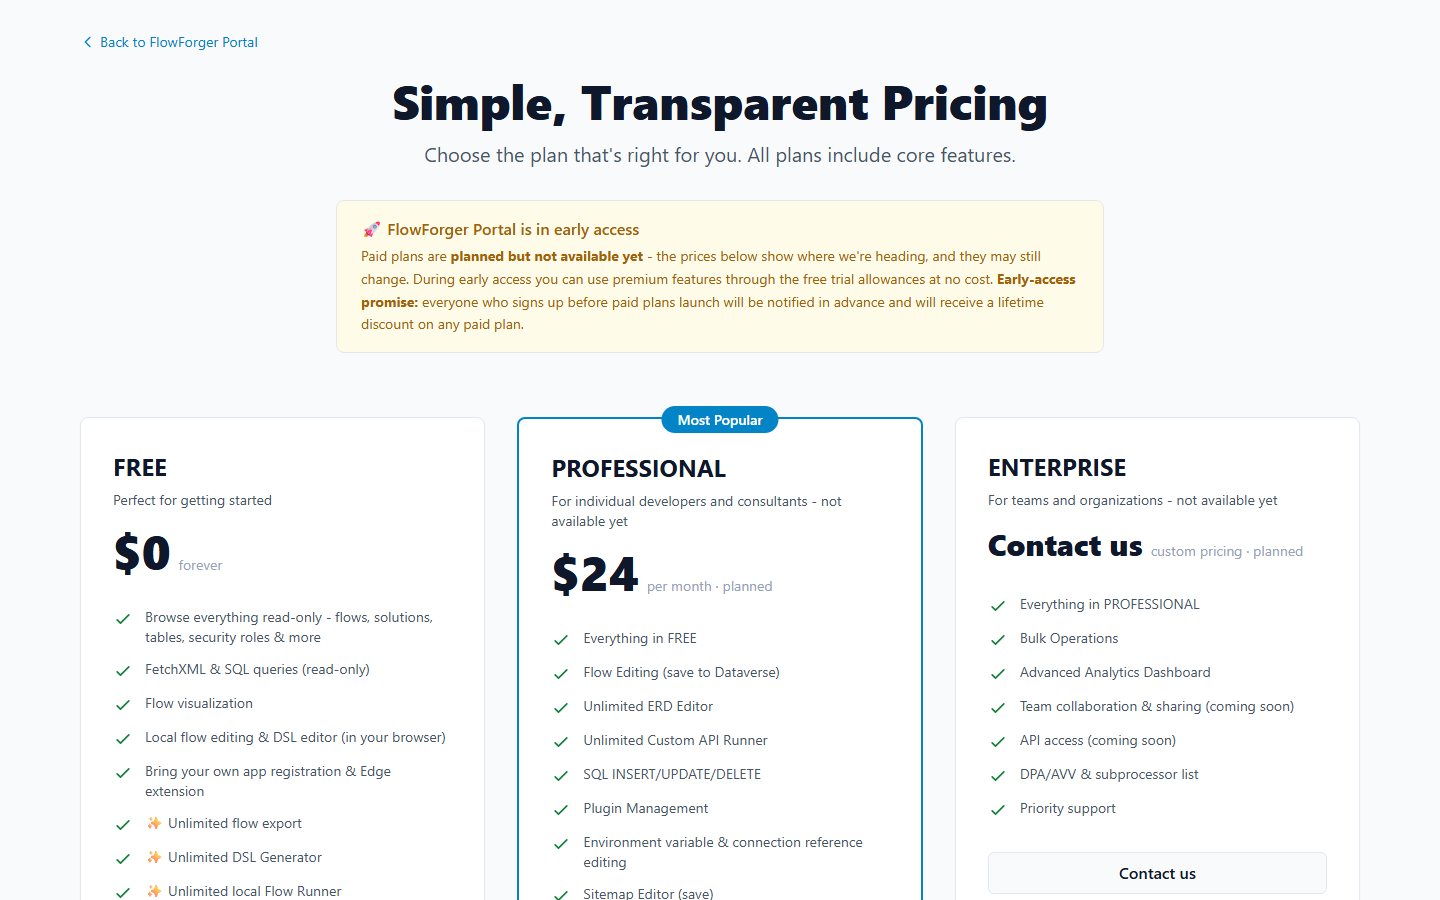 The pricing page with three plans
Early-access banner: The page notes that paid plans aren't live yet, that the listed prices may still change, and that everyone who signs up before paid plans launch will be notified in advance and receive a lifetime discount on any paid plan.
Plans
The table shows the limits that will apply once paid plans launch. Everything not listed here (browsing every page, FetchXML and SQL SELECT queries, SharePoint tools, flow visualization, local flow editing, the DSL editor, flow export, the DSL Generator, the local flow runner, Compare Flows and Compare Roles, your own app registration, and the browser extension) stays free.
| Feature | FREE | PROFESSIONAL ($24/mo, planned) | ENTERPRISE (custom, planned) |
|---|---|---|---|
| ERD Editor | 1 saved diagram | Unlimited | Unlimited |
| Custom API Runner | 3 runs | Unlimited | Unlimited |
SQL INSERT/UPDATE/DELETE (SQL Query and SP SQL Query) | 5 statements | Unlimited | Unlimited |
| Compare Solutions | 3 comparisons | Unlimited | Unlimited |
| Flow editing (saving a flow to Dataverse) | -- | Yes | Yes |
| Flow debugger in the Flow Editor | -- | Yes | Yes |
| Plugin assembly update | -- | Yes | Yes |
| Sitemap Editor (save and publish) | -- | Yes | Yes |
| Cloud workspace sync and flow backups | -- | Yes | Yes |
| Bulk operations on Cloud Flows | -- | -- | Yes |
The ERD allowance counts the diagrams you own: diagrams you already have stay editable, only creating more is limited. The other free allowances are counted per action (one API run, one executed statement, one comparison); the Pricing page describes them as monthly allowances. When a limit applies, the control stays visible; some buttons show a small badge with the uses left (or a lock once none are left), and clicking a feature you have no access to opens a dialog that explains which plan it needs.
The Pricing page also lists items that are not limited in the app: environment variable and connection reference editing, SharePoint write operations, an advanced analytics dashboard, email support, and for Enterprise team collaboration and API access (both marked "coming soon"), a DPA/AVV with a subprocessor list, and priority support.
FAQ Section
The pricing page answers common questions:
- How do trials work? -- Free users get allowances for some premium features, each counted as one user action.
- When will paid plans launch? -- No fixed date yet. Existing users will be notified well in advance before anything is limited, and listed prices may still change before launch.
- What happens to early-access users when paid plans launch? -- Everyone who signed up during early access receives a lifetime discount on any paid plan.
Call to Action
A closing banner links to Get Started Free when you are signed out, or Back to FlowForger Portal when you are signed in.