Apps and Components
This guide covers the Apps section of the sidebar, which groups together the model-driven app configuration pages: App Modules, Sitemaps, App Actions, and Web Resources. These pages let you browse the apps registered in an environment, edit their navigation structure, manage command bar buttons (Modern Commanding), and manage the JavaScript/HTML/CSS/image files used by forms and ribbons.
App Modules
Navigate to Apps → App Modules to browse all model-driven apps (and their metadata) registered in the selected environment.
Table Columns
- Name -- The app's display name with the unique name shown below in a code badge
- Description -- The app's description (truncated to two lines)
- Type -- Model-driven or Canvas (unrecognized client types are shown as "Type N")
- Version -- The app module version string
- Status -- Active (green) or Inactive (red) badge
- Modified -- Last modification date
Filters
- Search -- Free-text search across name, unique name, and description
- Status -- All, Active, or Inactive
- Clear Filters -- Resets both filters
Solution Filtering
When a solution is selected in the top header, only app modules that belong to that solution are shown. The subtitle updates to reflect the count and solution name.
Export and Pagination
Results can be exported to clipboard or Excel. Pagination supports 10, 25, 50, or 100 items per page (default 25).
Tip: This page is read-only -- it's meant for discovering which model-driven apps exist and their versions. To edit an app's site map, form, or command bar configuration, use the Sitemaps or App Actions pages, or the Power Apps maker portal.
Sitemaps
Navigate to Apps → Sitemaps to browse the site maps (navigation structures) defined for model-driven apps, then click any row to open the visual Sitemap Editor.
Sitemaps List
Table columns:
- Name -- The site map's display name (or "(unnamed)") with the unique name in a code badge
- State -- Color-coded badge: Published (green), Unpublished (yellow), or Deleted / Deleted Unpublished (red)
- Managed -- Yes/No badge
- Modified -- Last modification date
Filters:
- Search -- Search by name or unique name
- Managed -- All, Managed, or Unmanaged
- Clear Filters -- Resets both filters
Solution filtering: When a solution is selected, only site maps belonging to it are shown.
Click any row to open that site map in the Sitemap Editor. Pagination supports 10, 25, or 50 items per page (default 25).
Sitemap Editor
The editor provides both a visual tree editor and a raw XML editor for the site map's <SiteMap> XML.
Header:
- Back arrow returns to the Sitemaps list
- Site map name and unique name, with an Unsaved changes badge when the tree has been modified and a Managed badge for managed site maps
- Raw XML / Visual Editor toggle button switches between the tree view and a plain-text XML editor
- Save -- Persists the current XML to Dataverse (disabled until there are unsaved changes)
- Save & Publish -- Saves, then publishes the site map so the new navigation takes effect immediately in the app
Visual (tree) editor:
The left panel shows the parsed navigation tree: Areas containing Groups containing SubAreas (entities, dashboards, or URLs). For each level:
- Click a node to select it and edit its properties in the right-hand panel
- + Area (toolbar), +G (per area, adds a Group), and +S (per group, adds a SubArea) buttons create new nodes
- Expand All / Collapse All buttons in the toolbar toggle every node
- Nodes can be reordered by dragging their grip handle -- Areas can be reordered among Areas, Groups among Groups within the same Area, and SubAreas among SubAreas within the same Group. A blue drop indicator shows where the item will land
- The Properties panel toolbar has Move Up, Move Down, and Delete buttons for the selected node
Property Editor:
The right panel shows fields specific to the selected node type:
- Area -- Id (required), Title, Icon, Resource Id, Description Resource Id, URL, Show Groups
- Group -- Id (required), Title, Icon, Resource Id, Description Resource Id, URL, Is Profile
- SubArea -- Id (required), Entity (Table), Title, URL, Icon, Resource Id, Description Resource Id, Get Started Pane Path (plus Admin and Outlook variants), Client, Available Offline, Pass Params, SKU
Any XML attributes present on a node that aren't in the field list above appear under an Other Attributes section and remain editable as free text, so hand-authored or third-party site maps aren't stripped of unrecognized attributes.
Raw XML mode: Edit the site map XML directly in a plain-text area, then click Parse & Switch to Visual to validate and load it into the tree editor. Parse errors are shown inline and won't silently discard your edits.
Note: During early access, saving site maps is available to everyone. Once paid plans launch, Save and Save & Publish need a paid plan; on the free plan they open a dialog explaining this instead of saving. See Pricing.
Tip: Always use Save & Publish rather than Save alone if you want to see the navigation changes in the app right away -- Save only updates the record; publishing is what pushes the change to end users.
App Actions
Navigate to Apps → App Actions to browse and edit Modern Commanding actions -- the command bar buttons, dropdowns, and split buttons configured for model-driven app forms and grids.
Table Columns
- Name -- The button label (falls back to the internal name) with the unique name in a code badge
- Type -- Standard, Dropdown, Split Button, or Group
- Location -- Form, Main Grid, Sub Grid, Associated Grid, Quick Form, or Global Header
- Event -- The on-click event type: None, JavaScript, Custom API, Power Fx, or Custom Page
- App Module -- The parent app's name
- Managed -- Yes/No badge
- Modified -- Last modification date
Filters
- Search -- Search by name, unique name, or button label
- App Module -- Filter to actions belonging to a specific app (populated from all app modules in the environment)
- Action Type -- Filter by Standard, Dropdown, Split Button, or Group
- Event Type -- Filter by None, JavaScript, Custom API, Power Fx, or Custom Page
- Managed -- All, Managed, or Unmanaged
- Clear Filters -- Resets all five filters
Note: Selecting an App Module in the filter loads just that app's actions from Dataverse; the other filters then narrow that list.
Editing an App Action
Click any row to open the Edit App Action modal.
Read-only info: Name, Type, Context (Entity or All), and Status (Active/Inactive) are shown for reference.
Editable fields:
- Button Label -- The text shown on the command bar button
- Visibility Expression (Hidden) -- A Power Fx expression controlling when the button is hidden (e.g.
=!IsBlank(Self.Selected.Item.Status)) - Location -- Where the button appears (Form, Main Grid, Sub Grid, Associated Grid, Quick Form, or Global Header)
- Font Icon -- A Fluent UI icon name for the button (e.g.
Edit,Delete,Save) - On Click Event Type -- None, JavaScript, Custom API, Power Fx, or Custom Page
- JavaScript Function Name and JavaScript Parameters -- Shown only when the event type is JavaScript; the parameters field accepts JSON passed to the function
Managed app actions display a warning that editing may be restricted. The Save Changes button stays disabled until a field actually differs from its saved value, and only the changed fields are saved.
Export and Pagination
Results can be exported to clipboard or Excel. Pagination supports 10, 25, 50, or 100 items per page (default 50).
Tip: Modern Commanding actions are the successor to classic ribbon customizations. If a button doesn't behave as expected, check the Location and the Visibility Expression first -- a Power Fx expression that evaluates to
truewill hide the button entirely.
Web Resources
Navigate to Apps → Web Resources to manage JavaScript, HTML, CSS, images, and other web resource files in Dataverse.
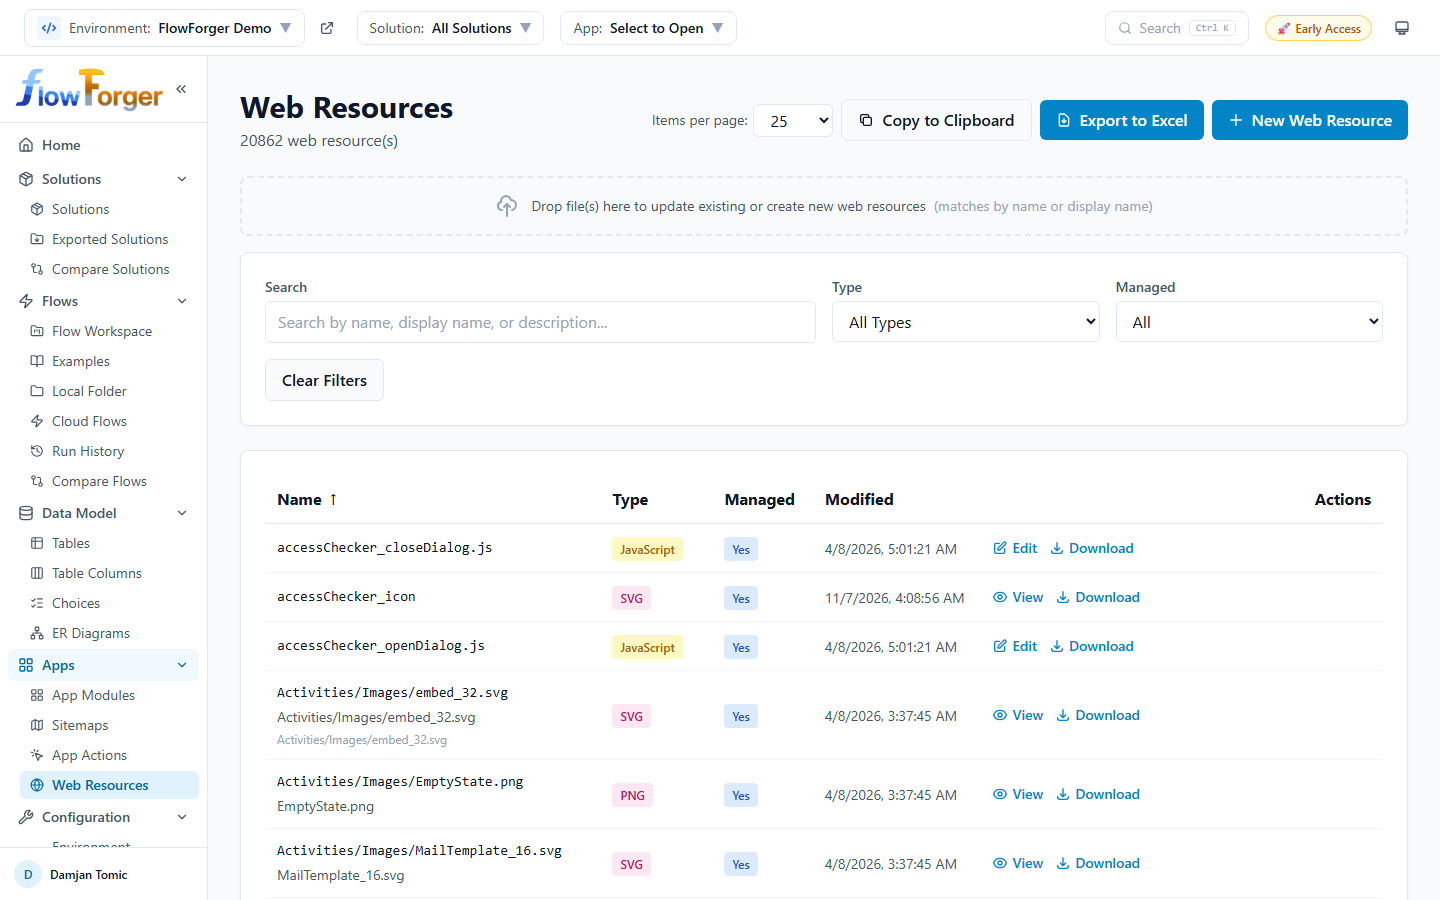 The Web Resources browser with drag-and-drop update zone
Table Columns
- Name -- Full resource path (e.g.,
prefix_/scripts/main.js) with optional display name and description shown below - Type -- Color-coded badge by file type: HTML (blue), CSS (purple), JavaScript (yellow), XML (green), Images -- PNG/JPG/GIF/ICO/SVG (pink), XSL (green), RESX (orange)
- Managed -- Yes/No badge
- Modified -- Last modification date
Row Actions
- Edit / View -- Opens the web resource modal. Text-based resources (HTML, JS, CSS, XML, XSL, RESX) open in a Monaco code editor with syntax highlighting matched to the type. Image resources (PNG, JPG, GIF, ICO, SVG) open in an image viewer instead.
- Download -- Saves the resource to your computer with the correct file extension.
Editing a Web Resource
The edit modal lets you change Display Name, Description, and Language (an LCID dropdown populated from the environment's available languages, useful for RESX localization files), and update the content itself -- either by editing directly in the Monaco editor or by dragging/uploading a replacement file. Three actions are available:
- Save -- Updates the record without publishing
- Save & Publish -- Updates the record and publishes it in one step
- Publish -- Publishes the currently saved content standalone, without making further edits
A Download button is also available inside the modal.
Quick Update Drop Zone
At the top of the page, a drag-and-drop zone lets you quickly push local file changes into Dataverse:
- Single file -- The dropped file is matched against existing web resources by comparing its filename (with and without extension, case-insensitive) to the last segment of the resource's name or its display name.
- Exactly one match -- opens the Edit modal with the new content preloaded.
- No match, but the extension is recognized -- opens the Create modal preloaded with the file instead, so you can create a new resource on the spot.
- Multiple matches -- shows an error asking you to use the table to pick the specific resource instead.
- Multiple files -- Opens the Bulk Update modal (see below). There is no ZIP support; drop any number of individual files and each one is matched independently.
Tip: The drop zone matches files by filename or display name, so keep your local filenames aligned with your Dataverse web resource names (or display names) for automatic matching.
Bulk Update Modal
When multiple files are dropped, each is classified as Matched (an existing resource was found), New (no match, but the file extension maps to a known web resource type so it can be created), Unknown Type (no match and the extension isn't recognized -- can't be created automatically), or Multiple (matched more than one resource -- must be resolved individually).
- Matched and creatable New files are pre-selected via checkboxes; use Select All / Deselect All to adjust
- A Name prefix for new resources field (default
new_/) controls the naming of newly created resources, shown live asprefix + filename - Save (N) applies the selected updates/creates without publishing; Save & Publish (N) does the same and then publishes all successfully changed resources in a single batch
- A progress bar tracks processing, and each row's Result column shows Done or Error (with the error message on hover) once processed
Creating a Web Resource
Click New Web Resource in the header to open the creation modal:
- Name -- If a solution with a publisher prefix is selected, the prefix (e.g.
new_) is prepended automatically; otherwise enter the fullprefix_/folder/filename.extpath - Type -- HTML, CSS, JavaScript, XML, PNG, JPG, GIF, XSL, ICO, SVG, or RESX
- Language -- Optional LCID for localization
- Display Name and Description -- Optional
- For text types, content can be typed directly in a Monaco editor (pre-filled with a basic boilerplate template for HTML/CSS/JS/XML/XSL/RESX) or toggled to file upload; for image/binary types, only file upload is available
Filters
- Search -- Search by name, display name, or description
- Type -- Filter by specific type (HTML, CSS, JavaScript, XML, PNG, JPG, GIF, XSL, ICO, SVG, RESX)
- Managed -- All, Managed, or Unmanaged
Export and Pagination
Results can be exported to clipboard or Excel with headers: Name, Display Name, Type, Managed, and Modified. Pagination supports 10, 25, 50, 100, or 200 items per page (default 25).
Tips and Best Practices
Tip: Use the Sitemap Editor's raw XML mode when you need to paste in a site map exported from another environment or authored by hand -- switching back to the visual editor will validate and parse it, surfacing any XML errors immediately.
Tip: App Actions replace many classic ribbon customizations in newer model-driven apps. If you're troubleshooting a missing or misbehaving command bar button, check App Actions before looking at classic ribbon XML.
Tip: When bulk-updating web resources, always double check the Name prefix field before saving -- it applies to every "New" file in the batch, so an incorrect prefix will create several mis-named resources at once.
Tip: Remember that editing a Sitemap or a Web Resource only takes effect for end users after publishing -- use Save & Publish (or the standalone Publish action for web resources) rather than Save alone when you want changes to go live immediately.